 |
| Confetti Recycled Wine Glass - Set of 2 Transforming trash into treasure—old soda bottles rescued from the landfill now grace your table with an explosion of sparkling colors. Broken pieces melted down and artfully reformed. Skilled hands create a new chapter, a new story. A sense of history in every sip. Stunning works of art, handcrafted by skilled artisans using techniques passed down generation to generation. Just like us, no two are exactly alike. Authentic. Interesting. The soul of expression. These incomparable pieces are made entirely by hand, mouthblown in a centuries old tradition. Color variations are to be expected, and are part of their unique charm. |

Welcome to "Vegan for a Healthy Life." We would love you to post ideas and recipes to the group. Whether you are a "Raw" Vegan, Vegetarian, follow the 80-10-10, congratulations on taking that step. We can all learn together.
Wednesday, April 29, 2015
Check Out These Fab Finds!
Check Out These Fab Finds!
|
| Confetti Recycled Wine Glass - Set of 2
Transforming trash into treasure—old soda bottles rescued from the landfill now grace your table with an explosion of sparkling colors. Broken pieces melted down and artfully reformed. Skilled hands create a new chapter, a new story. A sense of history in every sip. Stunning works of art, handcrafted by skilled artisans using techniques passed down generation to generation. Just like us, no two are exactly alike. Authentic. Interesting. The soul of expression. These incomparable pieces are made entirely by hand, mouthblown in a centuries old tradition. Color variations are to be expected, and are part of their unique charm.
|
Tuesday, April 28, 2015
Yummy - Apple Bars

Craving an energizing snack, but you would like to avoid the sugar and trans-fat loaded candy bars and other junk food? And not spend too much time in the kitchen while at it? Then, you have come across the perfect recipe. Thanks to their high omega-3 content from the chia and flax seeds, these apple bars will keep you going for hours. On top of that, they are made entirely with natural ingredients, such as nuts, seeds and fruit, and are bursting with juiciness thanks to the apples. And they only take about 10 minutes to make!
RAW VEGAN APPLE BARS [GLUTEN-FREE]
SERVES
10INGREDIENTS
- 1 cup hazelnuts
- ⅓ cup chia seeds
- ⅓ cup flaxseeds
- ⅔ cup pumpkin seeds
- 2 small apples, chopped
- 1 + ⅓ cup raisins
PREPARATION
- Chop the nuts and seeds in a food processor until you get a mixture resembling fine crumbs.
- Add apples and raisins and pulse until everything starts to stick together.
- Then scoop into a quick bread pan (I have a 31×11 cm bread pan, which is about 12×4 inches) or any other pan you prefer lined with parchment paper and press the mixture in evenly with a spoon.
- Refrigerate for at least two hours for easier portioning, cut into bars and enjoy!
NOTES
The recipe makes 8-10 bars, depending on desired size of each bar. They keep well in a refrigerator for up to four days or in the freezer for up to 2 months

Yummy - Apple Bars
Craving an energizing snack, but you would like to avoid the sugar and trans-fat loaded candy bars and other junk food? And not spend too much time in the kitchen while at it? Then, you have come across the perfect recipe. Thanks to their high omega-3 content from the chia and flax seeds, these apple bars will keep you going for hours. On top of that, they are made entirely with natural ingredients, such as nuts, seeds and fruit, and are bursting with juiciness thanks to the apples. And they only take about 10 minutes to make!
RAW VEGAN APPLE BARS [GLUTEN-FREE]
THIS RECIPE IS :
SERVES
10INGREDIENTS
- 1 cup hazelnuts
- ⅓ cup chia seeds
- ⅓ cup flaxseeds
- ⅔ cup pumpkin seeds
- 2 small apples, chopped
- 1 + ⅓ cup raisins
PREPARATION
- Chop the nuts and seeds in a food processor until you get a mixture resembling fine crumbs.
- Add apples and raisins and pulse until everything starts to stick together.
- Then scoop into a quick bread pan (I have a 31×11 cm bread pan, which is about 12×4 inches) or any other pan you prefer lined with parchment paper and press the mixture in evenly with a spoon.
- Refrigerate for at least two hours for easier portioning, cut into bars and enjoy!
NOTES
The recipe makes 8-10 bars, depending on desired size of each bar. They keep well in a refrigerator for up to four days or in the freezer for up to 2 months
Sensational Spring Green Smoothie
Spring Green Smoothie
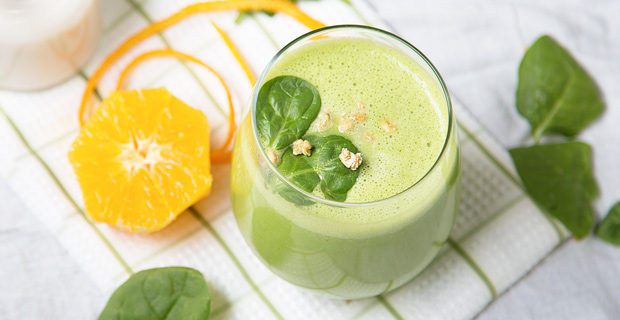
Ingredients
6 fl oz
unsweetened almond milk1 medium
apple, cored and quartered1
orange, peeled and halved1 tbsp
hemp seeds1 cup
fresh spinach1⁄4 cup
high-protein granola2 cups
ice cubes
6 fl oz
unsweetened almond milk
1 medium
apple, cored and quartered
1
orange, peeled and halved
1 tbsp
hemp seeds
1 cup
fresh spinach
1⁄4 cup
high-protein granola
2 cups
ice cubes
INSTRUCTIONS
- Add ingredients to FourSide or WildSide+ jar in order listed and secure lid. Best Blendtec Blenders
- Select "Smoothie" cycle or blend on a Low speed for 10 seconds, then a Medium to Medium-Low speed for 10 seconds, then Medium to Medium-High speed for 40 seconds.
NUTRITIONAL INFORMATION
- Servings 3.0
- Sodium 50 mg
- Serving Size 10 fl oz
- Carbohydrates 24 g
- Calories 130
- Fiber 5 g
- Fat 3.5 g
- Sugar 10 g
- Saturated Fat 0 g
- Protein 4 g
- Cholesterol 0 mg
Sensational Spring Green Smoothie
Spring Green Smoothie
Ingredients
6 fl oz
unsweetened almond milk
1 medium
apple, cored and quartered
1
orange, peeled and halved
1 tbsp
hemp seeds
1 cup
fresh spinach
1⁄4 cup
high-protein granola
2 cups
ice cubes
6 fl oz
unsweetened almond milk
1 medium
apple, cored and quartered
1
orange, peeled and halved
1 tbsp
hemp seeds
1 cup
fresh spinach
1⁄4 cup
high-protein granola
2 cups
ice cubes
INSTRUCTIONS
- Add ingredients to FourSide or WildSide+ jar in order listed and secure lid. Best Blendtec Blenders
- Select "Smoothie" cycle or blend on a Low speed for 10 seconds, then a Medium to Medium-Low speed for 10 seconds, then Medium to Medium-High speed for 40 seconds.
NUTRITIONAL INFORMATION
- Servings 3.0
- Sodium 50 mg
- Serving Size 10 fl oz
- Carbohydrates 24 g
- Calories 130
- Fiber 5 g
- Fat 3.5 g
- Sugar 10 g
- Saturated Fat 0 g
- Protein 4 g
- Cholesterol 0 mg
Monday, April 27, 2015


Sunday, April 26, 2015
Vegan for a Healthy Life : Almond Milk - Make Your Own :-)
Vegan for a Healthy Life : Almond Milk - Make Your Own :-): Those looking for a dairy-free milk substitute have probably stumbled across almond milk and wondered, “Is almond milk good for you?”...
Vegan for a Healthy Life : Almond Milk - Make Your Own :-)
Vegan for a Healthy Life : Almond Milk - Make Your Own :-): Those looking for a dairy-free milk substitute have probably stumbled across almond milk and wondered, “Is almond milk good for you?”...
Almond Milk - Make Your Own :-)

Those looking for a dairy-free milk substitute have probably stumbled across almond milk and wondered, “Is almond milk good for you?” Whether you’re a vegan, sensitive to milk or just don’t like the taste, almond milk is a fabulous alternative.
1. It helps with weight management.
One cup of almond milk contains only 60 calories, as opposed to 146 calories in whole milk, 122 calories in 2 percent, 102 calories in 1 percent, and 86 calories in skim. It makes for a great substitute that will help you lose or maintain your current weight.
2. It keeps your heart healthy.
There’s no cholesterol or saturated fat in almond milk. It’s also low in sodium and high in healthy fats (such as omega fatty acids, typically found in fish), which helps to prevent high blood pressure and heart disease.
3. It keeps your bones strong.
While it doesn’t offer as much calcium as cow’s milk, almond milk does offer 30 percent of the recommended daily amount, as well as 25 percent of the recommended amount of vitamin D, reducing your risk for arthritis and osteoporosis and improving your immune function. Plus, these two nutrients work together to provide healthy bones and teeth formation.
4. It keeps your skin glowing.
Almond milk contains 50 percent of the recommended daily amount of vitamin E, which contains antioxidant properties essential to your skin’s health, such as protecting it against sun damage.
5. It barely impacts your blood sugar.
Almond milk (with no additives) is low in carbs, which means it won’t significantly increase your blood sugar levels, reducing your risk for diabetes. Because of its low glycemic index, your body will use the carbs as energy so the sugars aren’t stored as fat (score!).
6. It contributes to muscle strength and healing.
Although almond milk only contains 1 gram of protein per serving, it contains plenty of B vitamins such as iron and riboflavin, both important for muscle growth and healing.
7. It keeps your digestion in check.
Almond milk contains almost one gram of fiber per serving, which is important for healthy digestion.
8. It doesn’t contain lactose.
Lactose intolerance impacts about 25% of the US population, which means they have difficulty digesting the sugar in cow’s milk. This makes almond milk a suitable, lactose-free substitute.
9. It tastes better than cow’s milk.
Almond milk doesn’t taste like cow’s milk, perfect for those who are turned off by the taste. It has its own unique flavor many describe as being light and crisp. Bonus: it’s versatile, meaning you can use it instead of cow’s milk in recipes that require it. It won’t have the same taste, but it will have the same consistency.
10. It doesn’t require refrigeration.
Knowing that you don’t have to refrigerate almond milk means you’ll be more likely to take it with you to work, or on a camping trip. It’s perfectly fine at room temperature which makes it a convenient, nutritious staple to pack, automatically upping your daily intake of all the fabulous nutrients above.
11. It’s easy to make.
Being that it’s a tad inconvenient to have a cow grazing in your backyard, almond milk is the convenient alternative to make at home. It’s made by finely grinding almonds and placing them in a blender with water, then filtering the pulp with a strainer to separate it from the liquid. Want to give it a try? Here’s a delicious almond milk recipe.
http://www.lifehack.org/articles/lifestyle/benefits-almond-milk.html
http://www.lifehack.org/articles/lifestyle/benefits-almond-milk.html
Almond Milk - Make Your Own :-)
Those looking for a dairy-free milk substitute have probably stumbled across almond milk and wondered, “Is almond milk good for you?” Whether you’re a vegan, sensitive to milk or just don’t like the taste, almond milk is a fabulous alternative.
1. It helps with weight management.
One cup of almond milk contains only 60 calories, as opposed to 146 calories in whole milk, 122 calories in 2 percent, 102 calories in 1 percent, and 86 calories in skim. It makes for a great substitute that will help you lose or maintain your current weight.
2. It keeps your heart healthy.
There’s no cholesterol or saturated fat in almond milk. It’s also low in sodium and high in healthy fats (such as omega fatty acids, typically found in fish), which helps to prevent high blood pressure and heart disease.
3. It keeps your bones strong.
While it doesn’t offer as much calcium as cow’s milk, almond milk does offer 30 percent of the recommended daily amount, as well as 25 percent of the recommended amount of vitamin D, reducing your risk for arthritis and osteoporosis and improving your immune function. Plus, these two nutrients work together to provide healthy bones and teeth formation.
4. It keeps your skin glowing.
Almond milk contains 50 percent of the recommended daily amount of vitamin E, which contains antioxidant properties essential to your skin’s health, such as protecting it against sun damage.
5. It barely impacts your blood sugar.
Almond milk (with no additives) is low in carbs, which means it won’t significantly increase your blood sugar levels, reducing your risk for diabetes. Because of its low glycemic index, your body will use the carbs as energy so the sugars aren’t stored as fat (score!).
6. It contributes to muscle strength and healing.
Although almond milk only contains 1 gram of protein per serving, it contains plenty of B vitamins such as iron and riboflavin, both important for muscle growth and healing.
7. It keeps your digestion in check.
Almond milk contains almost one gram of fiber per serving, which is important for healthy digestion.
8. It doesn’t contain lactose.
Lactose intolerance impacts about 25% of the US population, which means they have difficulty digesting the sugar in cow’s milk. This makes almond milk a suitable, lactose-free substitute.
9. It tastes better than cow’s milk.
Almond milk doesn’t taste like cow’s milk, perfect for those who are turned off by the taste. It has its own unique flavor many describe as being light and crisp. Bonus: it’s versatile, meaning you can use it instead of cow’s milk in recipes that require it. It won’t have the same taste, but it will have the same consistency.
10. It doesn’t require refrigeration.
Knowing that you don’t have to refrigerate almond milk means you’ll be more likely to take it with you to work, or on a camping trip. It’s perfectly fine at room temperature which makes it a convenient, nutritious staple to pack, automatically upping your daily intake of all the fabulous nutrients above.
11. It’s easy to make.
Being that it’s a tad inconvenient to have a cow grazing in your backyard, almond milk is the convenient alternative to make at home. It’s made by finely grinding almonds and placing them in a blender with water, then filtering the pulp with a strainer to separate it from the liquid. Want to give it a try? Here’s a delicious almond milk recipe.
http://www.lifehack.org/articles/lifestyle/benefits-almond-milk.html
http://www.lifehack.org/articles/lifestyle/benefits-almond-milk.html
Friday, April 24, 2015

Sunday, April 12, 2015
Yummy Broccoli Salad
http://www.onegreenplanet.org/vegan-recipe/broccoli-salad-with-quinoa-scallions-and-roasted-cashews/ 

Yummy Broccoli Salad
http://www.onegreenplanet.org/vegan-recipe/broccoli-salad-with-quinoa-scallions-and-roasted-cashews/
Sunday, April 5, 2015
Saturday, April 4, 2015
Yummy Carrot Cake Ice Cream Sandwiches
Carrot Cake Ice Cream Sandwiches {vegan & gluten free}
Recipe type: Dessert, Gluten Free, Vegan
Serves: 8-12
Ingredients
1 cup grated carrots
1 cup plus 2 tablespoons Bob's Red Mill Gluten Free 1:1 Baking Flour*
½ teaspoon baking soda
1½ teaspoon baking powder
½ teaspoon salt
½ teaspoon ground cinnamon
¼ teaspoon ground ginger
¼ teaspoon ground nutmeg
½ cup granulated sugar
1 tablespoon brown sugar
¼ cup vegetable oil, or melted coconut oil
1 teaspoon vanilla extract
¼ cup applesauce
½ cup almond milk
2-3 pints non-dairy ice cream, I used So Delicious Vanilla Coconut Milk Ice Cream**
Chopped walnuts, if desired
Instructions
Pre-heat oven to 325 degrees Fahrenheit.
Bring a medium sized pot of water to a boil. Fill a large bowl with ice water and set aside. Once water is boiling, throw in the grated carrots and leave them in for about 45 seconds. Drain carrots and immediately throw them into the ice bath. Once cooled, pat dry, squeeze out any extra water and set aside.
In a medium sized bowl add flour, baking soda, baking powder, salt, cinnamon, ginger, and nutmeg and stir. In a large bowl add granulated sugar, brown sugar, and oil. Cream together and then add vanilla, almond milk, and applesauce and mix again. Add dry mixture to wet mixture and beat with an electric mixer until combined. Using a spoon or spatula, stir in carrots.
Line a 9x13 baking dish with parchment paper. Evenly split the carrot cake batter in half. Spread ½ of the batter into the baking dish. It works best to go slow and use a plastic spatula to spread it out. It may look like there isn't enough at first, but there will be!
Bake the carrot cake for about 20 minutes, until cooked through and then place on a wire rack to cool. Then repeat with the remaining half of the batter. While both cakes are cooling, thaw the ice cream.
Flip one of the carrot cake sheets over and then slide back into a parchment paper lined baking dish. Once ice cream is thawed a bit, place the ice cream in a large bowl and whip with an electric mixture until smooth. Evenly spread the ice cream onto the bottom layer of cake and then slide top layer of cake on the top. Freeze for at least 6 hours, but overnight is ideal.
When ready to eat, let ice cream sandwiches thaw for a few minutes before cutting. Cut them into whatever shape you desire, I used circle cookie cutters and was able to get 8 ice cream sandwiches.
If desired, roll the outside of the ice cream sandwiches in chopped walnuts, it works best when the ice cream is slightly melted.
Notes
*I haven't tried this recipe with any other type of flour but it would probably work with gluten free AP flour as well as regular AP flour.
**I used 3 pints because I like lots of ice cream, but you could use less depending on how thick you want your ice cream to be.
Carrot Cake recipe adapted from Love and Lemons Vegan Carrot Cake Recipe
Recipe by She Likes Food at http://www.shelikesfood.com/1/post/2015/03/carrot-cake-ice-cream-sandwiches.html
Friday, April 3, 2015
Happy Friday!!!!!
Recipe Directions
INGREDIENTS
- 5 bananas
- 1 2/3 cups roughly chopped carrots (peeled)
- 1/4 cup water
- 1/4 cup dates
- 1/2 cup chia seeds (or flaxseed meal)
- 1 tablespoon vanilla
- 1 teaspoon cinnamon
- 1 pinch sea salt
- 1 cup raisins
- 1/2 cup chopped pecans (or chopped walnuts)
- 1/4 cup sesame seeds
- 1. Get out a large mixing bowl. Place raisins, pecans and sesame seeds in bowl. Set aside for later.
- 2. Place water, peeled bananas, vanilla, cinnamon and sea salt into your high speed blender. Once blending, add chopped carrots and dates. Mixture will be pretty thick. Try to avoid adding any extra water (besides the initial quarter cup). Blend until nicely combined and smooth, like a smoothie.
- 3. Try to do this step quickly: Add chia seeds to blender mixture and blend well. Since the mixture is already quite thick, your chia seeds might get stuck at the top of the mixture. If so, turn blender off and create an air pocket down the side of the mixture. Also, use your Vitamix tamper (big tool for mixing, like a big spoon) if you have one. Start blender on low again and increase speed. (Remember that chia seeds will thicken the mixture even more so work fast!)
- 3. Once your mixture seems as smooth as you can get it, find the mixing bowl that you set aside in step 1. Now, pour/spoon blender mixture on top of rasins, pecans and sesame seeds. Mix with a spoon. This should now resemble regular, Standard American Diet (SAD) banana bread batter.
- 4. Line two dehydrator trays with parchment paper or teflex sheets. (Do not use wax paper! It'll stick and be a disaster!)
- 5. Pour half of raw banana bread batter onto each tray. Smooth batter out with the back of a spoon (or with a palette knife/cracker spreader). Batter should be a 1/4 of an inch thick or a bit less. The thinner the batter is the better it will dehydrate, although you don't want it too thin because you want some moistness in the middle like "raw banana bread slices" not like dried out "banana crackers or cookies" if you know what I mean!
- 6. Dehydrate on high for 1.5 hours. Reduce temperature to 105 degrees and dehydrate your banana bread for another couple of hours. Once it seems to be holding together and drying out, score lines into the crackers with a knife so that you can more easily break them up later.
- 7. Keep dehydrating. At some point once they appear to be holding together very well you’ll want to remove the parchment paper, flip them over and finish dehydrating them. (You want to remove the parchment paper so that the air can flow around better without being blocked by the parchment paper.)
- 8. One you've flipped over your banana bread slices, keep monitoring based on how dry/moist you want your banana bread slices to be. Dehydrator times and temperatures can vary greatly so I urge you to check this raw banana bread recipe quite frequently. Don't be afraid to taste test, especially if you are new to dehydrating.
- 9. Once your banana bread is done, remove from dehydrator. Eat some right away, and let the others cool. If you want some extra excitement for your banana bread, you can top it with a cream-cheese like spread made from cashews. Enjoy this raw banana bread recipe!
The Rawtarian's Thoughts
 By The Rawtarian
Raw banana bread recipes are comfort food for me. I was raised on banana bread, carrot cake and zucchini bread, and I love all those tastes. So I've been enjoying recreating my favorite childhood flavors, starting with this raw banana bread recipe.
This is basically an easy raw banana bread recipe in terms of procedure--just blend everything together, add the "mix-ins" (raisins, etc) and then dehydrate. However, timing is very important because this raw banana bread blender mixture is pretty thick, and when you add the chia seeds the mixture will thicken even more, so you have to work fast to make this work. Don't be intimidated, it's very easy. You just have to be aware that you need to work a bit faster than normal when making this raw banana bread recipe, for example, have all your ingredients out on the counter and don't clean up until everything is in the dehydrator.
You can certainly serve this banana bread recipe on its own, or topped with almond butter or honey, or even topped with a delicious raw white icing that resembles cream cheese icing.
Subscribe to:
Posts (Atom)